Create an Audience
In this tutorial, you will learn how to create an audience in the GrowthLoop app using data directly from your data warehouse. Need a refresher on what an audience is?
Check out Intro to Audiences.
Overview
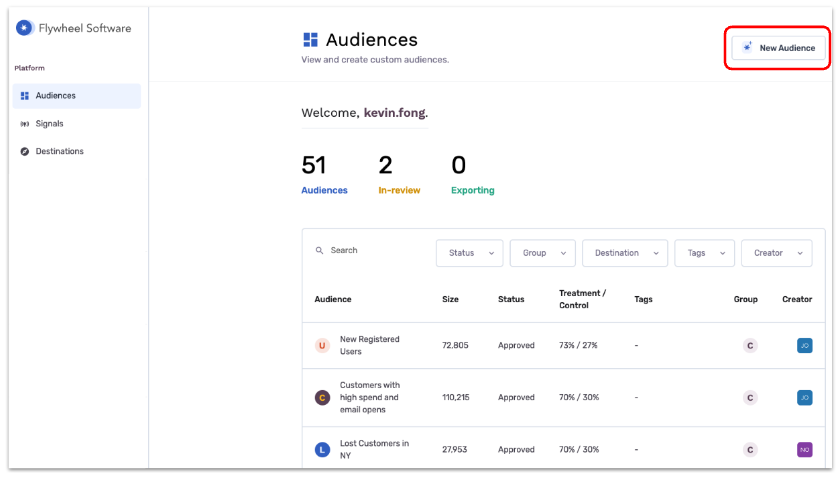
First, navigate to Audience under Platform in the GrowthLoop app on the left hand side. This will bring you to the Central Audience Hub where you can view, filter, and search all your organization’s audiences.
To create an audience, click New Audience in the upper right hand corner of the Central Audience Hub.
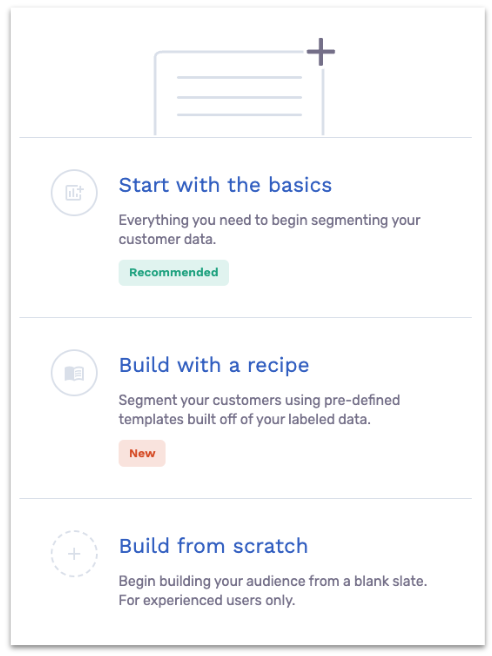
If you read Intro to Audiences, you’ll know you have 3 options to start building your first audience. Take your pick, but starting with the basics is recommended and then you can adjust from there.
Once you click on how you want to begin building your audience, you’re off to the audience builder!
Note: Your audience builder may look slightly different as your default settings configured by your admins may vary and the datasets connected are unique to each organization.New features may have also been released after this tutorial was created.
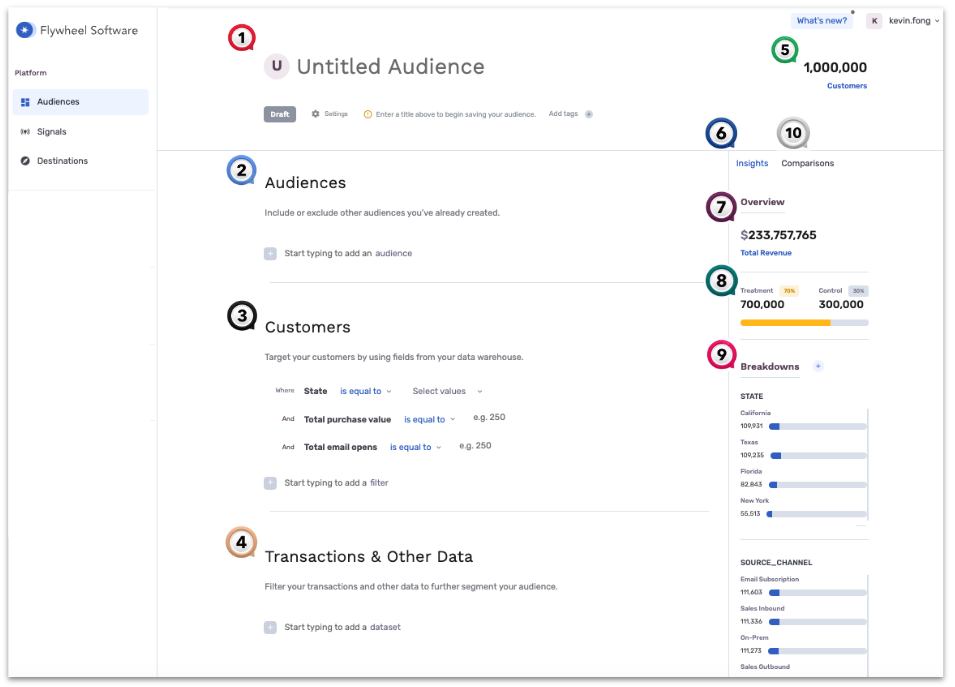
Audience Builder landing page
As you create an audience, here are some features to consider:
- Audience NameGive your audience a title and it’ll automatically begin saving your audience. Under the audience name, you will find some settings that will allow you to Auto-save audiences as you change filters, as well as refresh your live audience size. You can also add tags to help organize your audiences.
- Audience Inclusions and ExclusionsYou can include or exclude any audiences that have been created previously in GrowthLoop from the audience you are currently creating. This is helpful if you have building block audiences that might have been previously targeted. This is not a required field to create your audience.
- CustomersThis is where the fun happens. Default filters are typically shown here, but these can be updated by your admin. Start creating your audience by adding filters (+, or start typing to add a filter field) based on the fields in your data warehouse customers table, and start selecting or inputting values appropriately.
- Transactions & Other DataYou can add other transactions and events datasets to filter on objects in those datasets.Transactions dataset types typically include data that connect purchases and order details for targeting audiences by transactions.Events datasets typically include data to target users by attendance, RSVP status, and more. Note: Additional datasets need to be connected by an admin.
- Audience SizeAs you build out an audience, the size of the audience is automatically calculated when a filter is changed, added, or removed and populated in the top right of the screen.
- Audience InsightsAs you build your audiences, you can see insights into the audience you are building based on configurations selected such as Total Revenue, Treatment & Control, and audience Breakdowns.
- Overview - Total RevenueDefaulted typically to the total lifetime revenue of customers in the connected customer dataset.
- Treatment & ControlYou can create a treatment & control group for campaign evaluation.Simply adjust the slider left and right and you’ll notice the percentage of customers are allocated to either the treatment or control (i.e. will receive the advertisement vs not). You can read more on how we view campaign evaluation here.
- BreakdownsYou can see the breakdown of audiences by individual fields, increasing insight into audiences as you build them. This can help you make more educated decisions about whether or not to target a specific group. Click on the + on the right under Breakdown Report and add a field to see the report.
- ComparisonsHere you will find Audience comparisons that allow you to find a pre-existing audience to compare overlap with the customers matching your current audience criteria. You can then exclude members from an audience that overlaps with another audience, to prevent double-targeting.
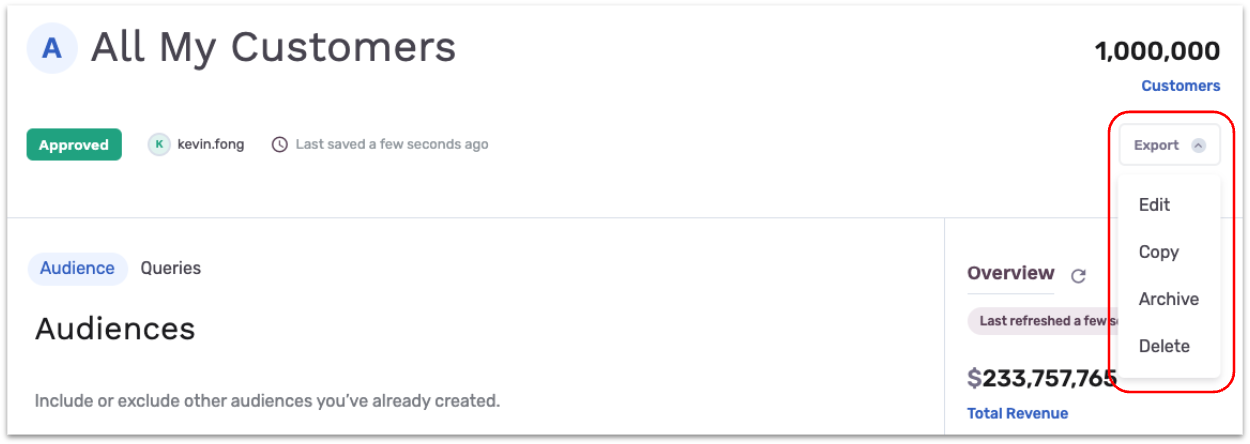
- Export AudienceOnce your audience has a title and is saved, an Export Audience button will appear at the top right under your audience size, allowing you to export your audience to your connected destinations.

You can revisit any audience in the Central Audience Hub and perform a few different actions:
- Export: Export the audience to one or many CRM or Ad destinations, cross-channel!
- Edit: Edit the audience to make adjustments. Note: Once an audience is exported, you cannot make edits. This is to prevent any possible errors in existing activity. We recommend copying the audience, adjusting, and re-exporting.
- Copy: Copy the audience to adjust filters, while keeping the original intact. Make sure to name the copied audience accordingly so that you know the difference between this audience and the original.
- Archive: Archiving an audience hides this audience from the Central Audience Hub, but can be searched by archive status, with an option to copy and use again.
- Delete: Delete the audience. Once this action is taken you can't revert. Consider archiving if you might want to revisit the audience.
Now it is your turn...What audience will you build next?
Want to learn how to export your audience to Facebook, Adwords, or other destination platforms? Go to the Destinations category to learn how. If you need any help, visit our help center or reach out to [email protected].
Updated 2 months ago